![]()
Flutter Widget
Flutter的小部件是屏幕上显示的所有内容的基础,类似于Android和IOS的View概念
目录
- 显示小部件
- 更新小部件的状态信息
- 摆放小部件
- 添加、删除小部件
- 小部件设置动画
- 使用Canvas绘画
- 自定义Widget
- 全篇汇总效果图
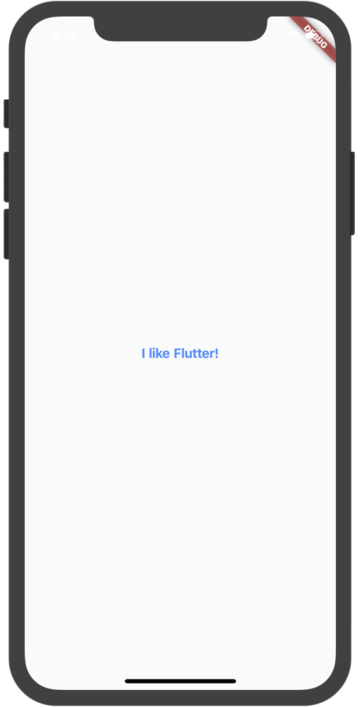
1. 显示视图/小部件
import 'package:flutter/material.dart';

void main() {
  runApp(MaterialApp(
    home: Scaffold(
        body: Center(
      child: Text(
        'I like Flutter!',
        style: TextStyle(
            fontWeight: FontWeight.bold,
            fontSize: 16,
            color: Colors.blueAccent),
      ),
    )),
  ));
}
效果:
 |
|---|
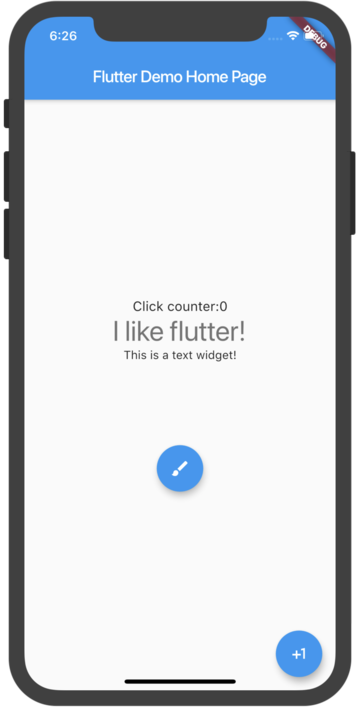
2. 更新视图/小部件的状态/显示信息
import 'package:flutter/material.dart';

void main() {
  runApp(MyApp());
}

class MyApp extends StatelessWidget {
  // This widget is the root of your application.
  @override
  Widget build(BuildContext context) {
    return MaterialApp(
      title: 'Flutter Demo',
      theme: ThemeData(
        primarySwatch: Colors.blue,
      ),
      home: MyHomePage(title: 'Flutter Demo Home Page'),
    );
  }
}

class MyHomePage extends StatefulWidget {
  MyHomePage({Key key, this.title}) : super(key: key);


  final String title;

//  @override
//  _MyHomePageState createState() => _MyHomePageState();
  @override
  State<StatefulWidget> createState() {
    return _MyHomePageState();
  }
}

class _MyHomePageState extends State<MyHomePage> {
  int _counter = 0;

  static String textToShowOne = "I like flutter!";
  static String textToShowTwo = "Flutter is Awesome!";

  String textToShow = textToShowOne;

  void _incrementCounter() {
    /*
    更新状态
    调用setState方法,将会触发build()调用
     */
    setState(() {
      //
      _counter++;
    });
  }

  void switchShowText() {
    setState(() {
      //operate something.
      _counter ++;
      if (_counter % 2 == 0) {
        textToShow = textToShowTwo;
      } else {
        textToShow = textToShowOne;
      }
    });
  }

  @override
  Widget build(BuildContext context) {

    return Scaffold(
      appBar: AppBar(
        // Here we take the value from the MyHomePage object that was created by
        // the App.build method, and use it to set our appbar title.
        title: Text(widget.title),
      ),
      body: Center(
        // Center is a layout widget. It takes a single child and positions it
        // in the middle of the parent.
        child: Column(
          mainAxisAlignment: MainAxisAlignment.center,
          children: <Widget>[
            Text(
              'Click counter:$_counter',
              style: TextStyle(fontSize: 16),
            ),
            Text(
              '$textToShow',
              style: Theme.of(context).textTheme.display1,
            ),
          ],
        ),
      ),
      floatingActionButton: FloatingActionButton(
        onPressed: () {
          switchShowText();
        },
        tooltip: 'Increment',
        child: Icon(Icons.plus_one),
      ), // This trailing comma makes auto-formatting nicer for build methods.
    );
  }
}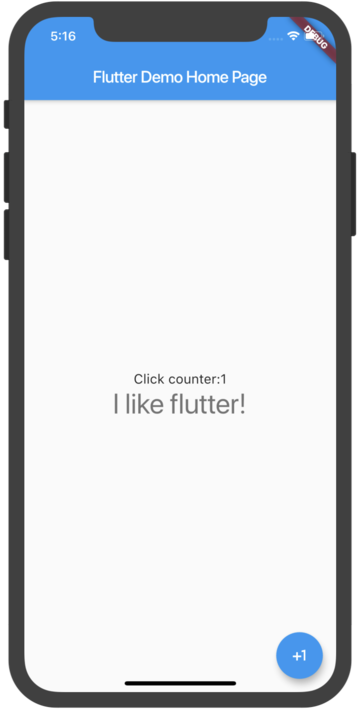 |
 |
|---|
3. 摆放小部件
Android和IOS既可以使用代码创建视图、摆放视图,又可以使用XML和Storyboard;
而Flutter类似于React native只可以使用代码创建视图、摆放视图。
@override
Widget build(BuildContext context) {
return Scaffold(
appBar: AppBar(
title: Text("Sample App"),
),
body: Center(
child: MaterialButton(
onPressed: () {},
child: Text('Hello'),
padding: EdgeInsets.only(left: 10.0, right: 10.0),
),
),
);
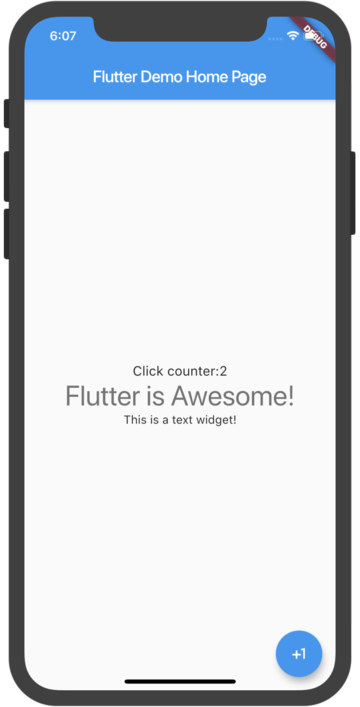
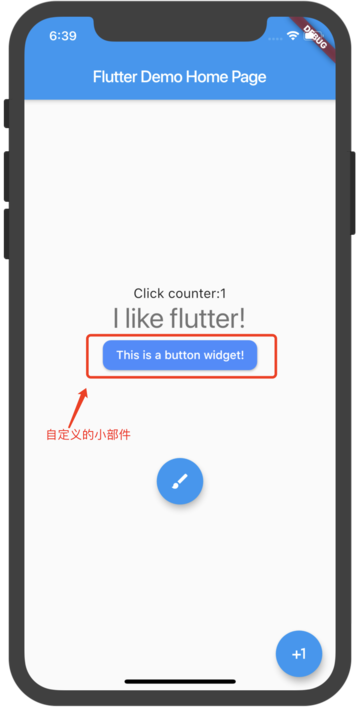
}4. 添加、删除小部件
在Android中,可以调用父项的addChild()和removeChild()在父项上动态的添加和删除子视图。在Flutter中,因为小部件是不可变的,所以没有直接的addChild()等价物。相反,可以将函数传递给窗口小部件的父级,并使用布尔标志控制该子级的创建。
核心示例:
dynamic getWidget() {
  if (_counter % 2 == 0) {
    return Text('This is a text widget!');
  } else {
    return RaisedButton(
      onPressed: () {},
      child: Text('This is a button widget!'),
      color: Colors.blueAccent,
      textColor: Colors.white,
      shape: RoundedRectangleBorder(borderRadius: BorderRadius.all(Radius.circular(10))),
    );
  }
}
全部示例:
import 'package:flutter/material.dart';

void main() {
  runApp(MyApp());
}

class MyApp extends StatelessWidget {
  // This widget is the root of your application.
  @override
  Widget build(BuildContext context) {
    return MaterialApp(
      title: 'Flutter Demo',
      theme: ThemeData(
        primarySwatch: Colors.blue,
      ),
      home: MyHomePage(title: 'Flutter Demo Home Page'),
    );
  }
}

class MyHomePage extends StatefulWidget {
  MyHomePage({Key key, this.title}) : super(key: key);

  final String title;

//  @override
//  _MyHomePageState createState() => _MyHomePageState();
  @override
  State<StatefulWidget> createState() {
    return _MyHomePageState();
  }
}

class _MyHomePageState extends State<MyHomePage> {
  int _counter = 0;

  static String textToShowOne = "I like flutter!";
  static String textToShowTwo = "Flutter is Awesome!";

  String textToShow = textToShowOne;

  void _incrementCounter() {
    /*
    更新状态
    调用setState方法,将会触发build()调用
     */
    setState(() {
      //
      _counter++;
    });
  }

  void switchShowText() {
    setState(() {
      //operate something.
      _counter++;
      if (_counter % 2 == 0) {
        textToShow = textToShowTwo;
      } else {
        textToShow = textToShowOne;
      }
    });
  }

  dynamic getWidget() {
    if (_counter % 2 == 0) {
      return Text('This is a text widget!');
    } else {
      return RaisedButton(
        onPressed: () {},
        child: Text('This is a button widget!'),
        color: Colors.blueAccent,
        textColor: Colors.white,
        shape: RoundedRectangleBorder(borderRadius: BorderRadius.all(Radius.circular(10))),
      );
    }
  }

  @override
  Widget build(BuildContext context) {
    return Scaffold(
      appBar: AppBar(
        // Here we take the value from the MyHomePage object that was created by
        // the App.build method, and use it to set our appbar title.
        title: Text(widget.title),
      ),
      body: Center(
        // Center is a layout widget. It takes a single child and positions it
        // in the middle of the parent.
        child: Column(
          mainAxisAlignment: MainAxisAlignment.center,
          children: <Widget>[
            Text(
              'Click counter:$_counter',
              style: TextStyle(fontSize: 16),
            ),
            Text(
              '$textToShow',
              style: Theme.of(context).textTheme.display1,
            ),
            getWidget(),
          ],
        ),
      ),
      floatingActionButton: FloatingActionButton(
        onPressed: () {
          switchShowText();
        },
        tooltip: 'Increment',
        child: Icon(Icons.plus_one),
      ), // This trailing comma makes auto-formatting nicer for build methods.
    );
  }
}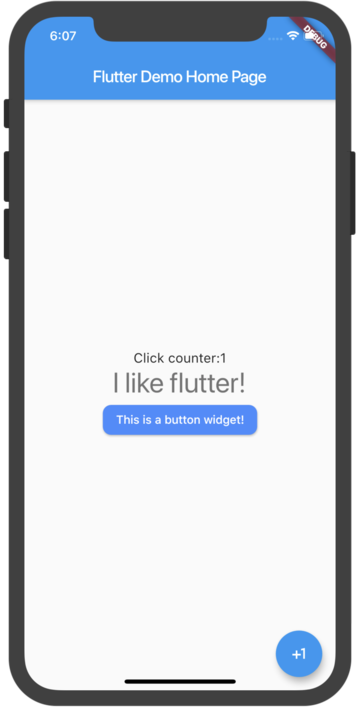 |
 |
|---|
5. 小部件设置动画
核心示例:
AnimationController controller;
CurvedAnimation curve;

@override
void initState() {
  super.initState();
  controller = AnimationController(
      duration: const Duration(milliseconds: 2000), vsync: this);
  curve = CurvedAnimation(parent: controller, curve: Curves.easeIn);
}

      ......此处省略若干


      FadeTransition(
          opacity: curve,
          child: FlutterLogo(
            size: 100.0,
          )),
      FloatingActionButton(
        onPressed: () {
          /*
          start animation.
           */

          if(controller.isAnimating){
            return;
          }
          if(controller.isCompleted){
            controller.reverse();
            return;
          }

          controller.forward();
        },
        tooltip: 'play animation',
        child: Icon(Icons.brush),
      ),
全部示例:
import 'package:flutter/material.dart';

void main() {
  runApp(MyApp());
}

class MyApp extends StatelessWidget {
  // This widget is the root of your application.
  @override
  Widget build(BuildContext context) {
    return MaterialApp(
      title: 'Flutter Demo',
      theme: ThemeData(
        primarySwatch: Colors.blue,
      ),
      home: MyHomePage(title: 'Flutter Demo Home Page'),
    );
  }
}

class MyHomePage extends StatefulWidget {
  MyHomePage({Key key, this.title}) : super(key: key);

  final String title;

//  @override
//  _MyHomePageState createState() => _MyHomePageState();
  @override
  State<StatefulWidget> createState() {
    return _MyHomePageState();
  }
}

class _MyHomePageState extends State<MyHomePage> with TickerProviderStateMixin {
  int _counter = 0;

  static String textToShowOne = "I like flutter!";
  static String textToShowTwo = "Flutter is Awesome!";

  String textToShow = textToShowOne;

  AnimationController controller;
  CurvedAnimation curve;

  @override
  void initState() {
    super.initState();
    controller = AnimationController(
        duration: const Duration(milliseconds: 2000), vsync: this);
    curve = CurvedAnimation(parent: controller, curve: Curves.easeIn);
  }

  void _incrementCounter() {
    /*
    更新状态
    调用setState方法,将会触发build()调用
     */
    setState(() {
      //
      _counter++;
    });
  }

  void switchShowText() {
    setState(() {
      //operate something.
      _counter++;
      if (_counter % 2 == 0) {
        textToShow = textToShowTwo;
      } else {
        textToShow = textToShowOne;
      }
    });
  }

  dynamic getWidget() {
    if (_counter % 2 == 0) {
      return Text('This is a text widget!');
    } else {
      return RaisedButton(
        onPressed: () {},
        child: Text('This is a button widget!'),
        color: Colors.blueAccent,
        textColor: Colors.white,
        shape: RoundedRectangleBorder(
            borderRadius: BorderRadius.all(Radius.circular(10))),
      );
    }
  }

  @override
  Widget build(BuildContext context) {
    return Scaffold(
      appBar: AppBar(
        // Here we take the value from the MyHomePage object that was created by
        // the App.build method, and use it to set our appbar title.
        title: Text(widget.title),
      ),
      body: Center(
        // Center is a layout widget. It takes a single child and positions it
        // in the middle of the parent.
        child: Column(
          mainAxisAlignment: MainAxisAlignment.center,
          children: <Widget>[
            Text(
              'Click counter:$_counter',
              style: TextStyle(fontSize: 16),
            ),
            Text(
              '$textToShow',
              style: Theme.of(context).textTheme.display1,
            ),
            getWidget(),
            FadeTransition(
                opacity: curve,
                child: FlutterLogo(
                  size: 100.0,
                )),
            FloatingActionButton(
              onPressed: () {
                /*
                start animation.
                 */

                if(controller.isAnimating){
                  return;
                }
                if(controller.isCompleted){
                  controller.reverse();
                  return;
                }

                controller.forward();
              },
              tooltip: 'play animation',
              child: Icon(Icons.brush),
            ),
          ],
        ),
      ),
      floatingActionButton: FloatingActionButton(
        onPressed: () {
          switchShowText();
        },
        tooltip: 'Increment',
        child: Icon(Icons.plus_one),
      ), // This trailing comma makes auto-formatting nicer for build methods.
    );
  }
} |
 |
 |
|---|
6. 使用Canvas绘画
在Android中,可以使用Canvas和Drawables在屏幕上绘制图像和形状。
Flutter也有类似的CanvasAPI,因为他基于相同的低级渲染引擎Skia。Flutter中的CustomPaint和CustomPainter是绘制帮助类。
import 'package:flutter/material.dart';

void main() => runApp(MaterialApp(home: DemoApp()));

class DemoApp extends StatelessWidget {
  Widget build(BuildContext context) => Scaffold(body: Signature());
}

class Signature extends StatefulWidget {
  SignatureState createState() => SignatureState();
}

class SignatureState extends State<Signature> {
  List<Offset> _points = <Offset>[];
  Widget build(BuildContext context) {
    return GestureDetector(
      onPanUpdate: (DragUpdateDetails details) {
        setState(() {
          RenderBox referenceBox = context.findRenderObject();
          Offset localPosition =
          referenceBox.globalToLocal(details.globalPosition);
          _points = List.from(_points)..add(localPosition);
        });
      },
      onPanEnd: (DragEndDetails details) => _points.add(null),
      child: CustomPaint(painter: SignaturePainter(_points), size: Size.infinite),
    );
  }
}

class SignaturePainter extends CustomPainter {
  SignaturePainter(this.points);
  final List<Offset> points;
  void paint(Canvas canvas, Size size) {
    var paint = Paint()
      ..color = Colors.black
      ..strokeCap = StrokeCap.round
      ..strokeWidth = 5.0;
    for (int i = 0; i < points.length - 1; i++) {
      if (points[i] != null && points[i + 1] != null)
        canvas.drawLine(points[i], points[i + 1], paint);
    }
  }
  bool shouldRepaint(SignaturePainter other) => other.points != points;
}
7. 自定义Widget
在Flutter中,通过组合小部件来构建自定义小部件。
类似于在Android中通过组合来实现ViewGroup。
自定义小部件
class CustomButton extends StatelessWidget {
  final String label;

  CustomButton(this.label);

  @override
  Widget build(BuildContext context) {
    return RaisedButton(onPressed: () {}, child: Text(label));
  }
}
使用自定义的小部件
@override
Widget build(BuildContext context) {
  return Center(
    child: CustomButton("Hello"),
  );
} |
|---|
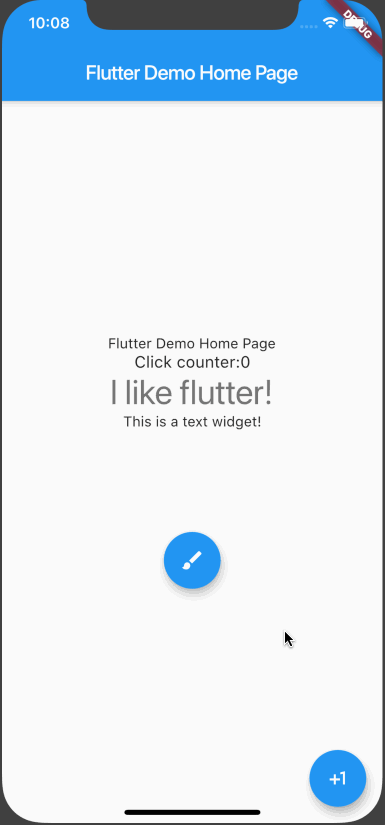
8. 全篇汇总效果图
 |
|---|
未完待续。。。